Launch gimp and open the document in which you want to draw a dotted line. Adjust the line width to whatever you prefer and click on.
Gimp Chat Drawing Dotted Lines Using The Path Paintbrush Tools
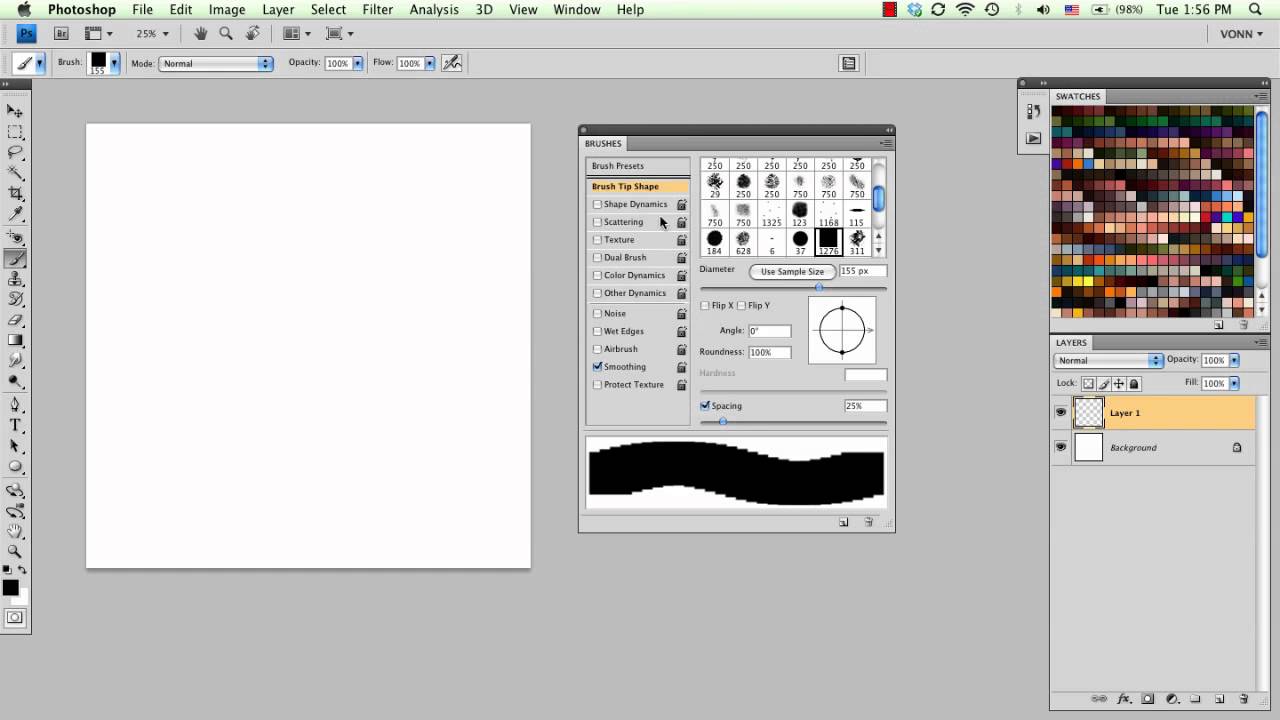
The size of this dot represents the current brush size which you can change in the Brush Dialog.

. Try the Brush Tool for anti-aliased smooth brushstrokes and set the Spacing to the standard 10. When i open your file there is an active selection going on. The process for drawing a straight line in GIMP the GNU Image Manipulation Program is similar to the method in Adobe Photoshop.
In GIMP select your preferred brush tool click the point that begins your line hold the Shift key and drag your cursor to where you want the line to end. Doesnt work on a transparent background. Drawing Dashed Lines new user question In the brush selection dialog select new and youll get a box showing a basic brush and 4 sliders.
Still after being annoyed by that little dotted line for so long I feel like getting rid of it is cause for. Gimp quick type how to make a dotted dashed line circle square rectangle in GIMP. This drop-list brings some.
Overwrite untitled with whathever name you want then close the editor. There are a few ways to make a dotted line in Gimp. Gimp quick type how to make a dotted dashed line circle square rectangle in gimp.
Click the endpoint this creates a straight line between the two points with your. It seems you are using the Pencil Tool with a big spacing value. But you can put a white background below the lines merge down and then use Erode.
The size of this dot represents the current brush size which you can change in the Brush Dialog see Section 32 Brushes Dialog Now lets start drawing a. Angle to whatever you want 0horizontal 90vertical and put the widthheight ration to the max. After you click the paintbrush tool you can click the image.
You can draw a straight solid line in Gimp by clicking on the start point holding down the Shift key and clicking on the end point. For starters youll want to create a new document if you dont have one open already by going to FileNew. Look at the bottom of the dialogue.
Go to the Layers panel and create a new layer with transparent background. Select and customize your brush then click once on your image to set the first point on your straight line Step 2. Create a New Composition Layer.
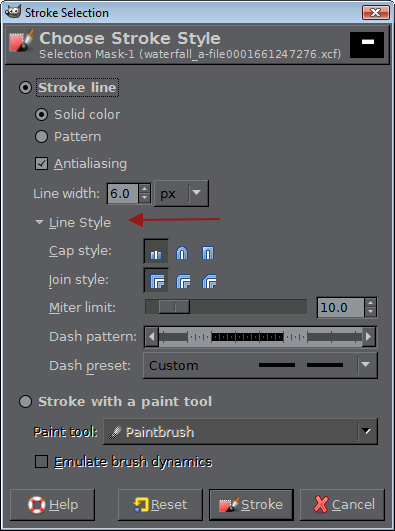
Its located just below the Line Width setting. That is if you select a marbled pattern and Patterned dashed lines the dashes are drawn in the marbled pattern Line Style. Creating a dotted or dashed line with GIMP is easy with the Paths Tool.
Click on View in the Main Menu and click Show Layer Boundary box to uncheck that option. You will get a dialog allowing you to set many options for stroking your selection including dashed lines and other fancy features. Heres how to use it.
Click in the image where you want a line to start or end. The path tool pen tool is a powerful tool in gimp. Now use Color to Alpha to remove the white background.
Then you can use the eraser tool to break it up into dashes. A single dot will appear on the screen. There youll find a slider called spacing set it to somewhere around 200 to.
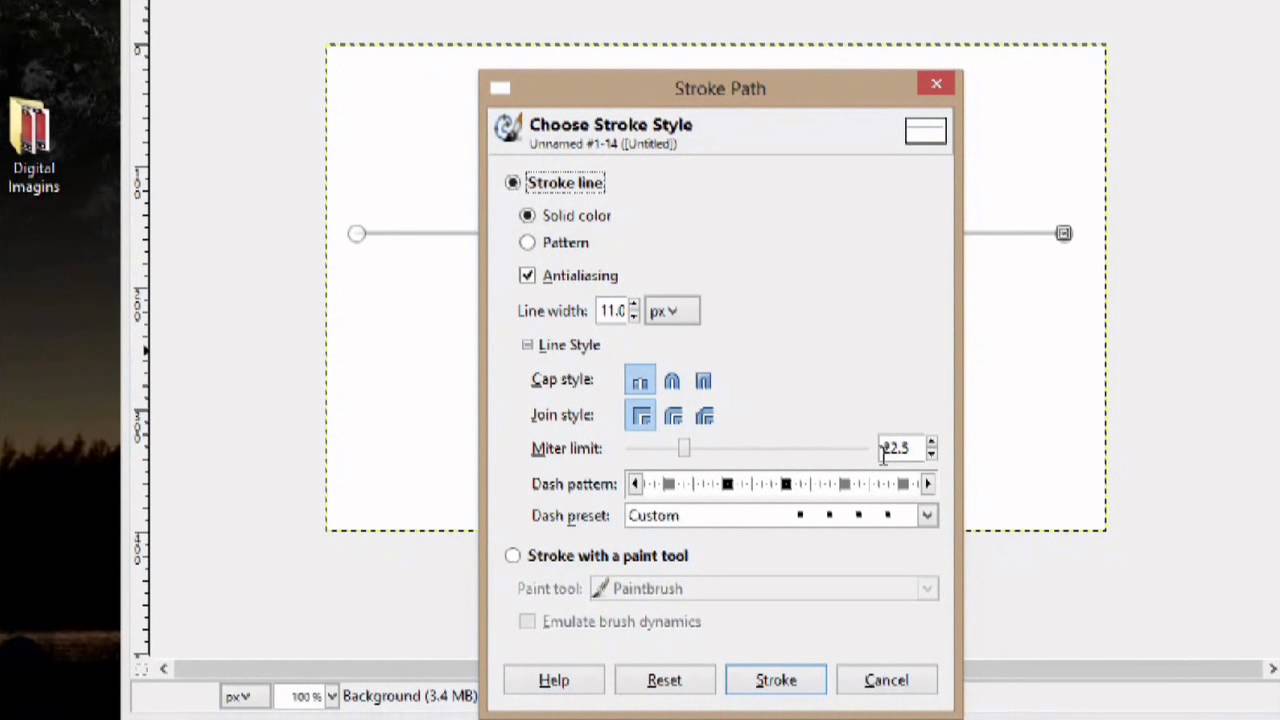
In the Stroke Path Dialog window you can adjust the lines style via the Line Style option. Click on the paintbrush in the toolbox. Now lets start drawing a line.
When all the options are selected you can click on Edit - Stroke. Gimp draw dotted line. GIMP will automatically fill the.
Just open the brushes dialog ctrlshiftB or windows-dockable dialogues- brushesand select a round almost hard brush. A single dot will appear on the screen. One way is to use the Pen tool and set the width to 5 and the thickness to 025.
When done click on Stroke Path in the tools. Still after being annoyed by that little dotted line for so long I feel like getting rid of it is cause for celebration. If you stroke the path with a paint tool the current paint tool options are used to draw the stroke.
To prevent the eraser from blanking out detail in the original image its convenient to draw your dashed line on a separate layer see the note on layers. Thats why you get these dotted lines with jagged looking dots. The stroke is drawn with the current foreground color set in the Toolbox.
Click on Line Style to expand the styling options. If it is black lines on a white background or dark lines on light background you can use Filters Generic Erode. If you want to do dotted lines as opposed to dashed ones you can quite easily use the paintbrushitself.
If you select Stroke Using a Paint Tool you will be. Hold down the Shift key and click again to set the second point of your line. Choose the dimensions for your document I went with 1920 x 1080 pixels red.
SelectTo path makes a path with 4 points where everything is perfectly horizontal and vertical Delete the sides and anchor point you dont need Ctrl-Shift-click on them in the path editor SelectNone otherwise only half of the line will be drawn EditStroke path with a dashed line Share. Selecting the path tool and making. On a side note.
Click on View in the Main Menu and click Show Layer Boundary box to uncheck that option. Hold down the Shift button and keep it down. I think a lot of the issue is just knowing that yellow dotted line in GIMP is called the Layer Boundary.
Tip Creating A Dotted And Dashed Line In Photoshop And Gimp Youtube

Elements And Design Line Art Line Art Design Line Patterns
How To Make Dotted Line In Gimp Dashed Line In Gimp Youtube

How To Draw A Dotted Line In Gimp Your Business
Discover How To Center Text In Gimp Gimp Tutorial Text Tutorial Gimp

Turn Off Dotted Yellow Line In Gimp How To Gimp

Gimp Tutorial Painting Crazy Random Dots Youtube Gimp Tutorial Tutorial Art Tutorials
Making Dotted Lines In Gimp Digital Imaging Youtube
0 comments
Post a Comment